
The subject
As we all know, the iconic Supermarine Spitfire is often argued to be one of the most beautiful aircraft that was ever produced, is one of the most famous airplanes in the world and probably the most known one from Great Britain. The origin of this machine dates all the way back to the Schneider trophy aircraft from the 1920’s, as R.J. Mitchell and his design team examined their earlier Supermarine S.4, S.5 and S.6 racing seaplane designs. They wanted to refine these into a modern fighter plane that would comply with certain specifications demanded by the Air Ministry. In 1936 the prototype took its first flight and went on to become the legendary plane we all know, flying on until 1961 in the Irish air corps.
The Pr. XIX is basically a Mk.XIX with photographic equipment. This also means it was outfitted with ‘D-type wings’ which had no armament and the “D” shaped leading edges of the wings. Because of the removal of the armament ahead of the main spar, that space was converted into integral fuel tanks. To prevent the expansion of fuel causing damage to the aircraft in warmer weather, small external vent pipes were also fitted near the wings tips. The aircraft was meant to fly at high speed and high altitude.
By the end of the Second World War, the Royal Air Force had replaced nearly all their previous Mk XI’s with Pr. XIX’s. In 1951, Hainan Island was targeted at the behest of the U.S. Naval Intelligence. The XIX’s of the RAF played a mayor role in this operation as they performed reconnaissance missions over People’s Republic of China with their XIX’s based at Hong Kong. The last operational sortie of a Pr. XIX was for trials against an English Electric Lightning, which were to determine how a Lightning could engage piston-engined aircraft in the best possible position. This was in case that if the RAF would be dragged into the Indonesian conflict and Lightnings would have to engage their P-51 Mustangs. It was at the time not the last sortie of the Pr. XIX, but also the last sortie of any Spitfire in RAF service.
The Swedish Air force was also one of the many users of the Spitfire, using the Pr XIX from 1948 until 1955 as a reconnaissance plane with no armament. It was used to fly recon missions over the Soviet Union and neighboring countries. These very aircraft had been bought from the RAF who considered them to be obsolete by European standards at the end of Second World War. The Swedes ultimately replaced it with the Saab J.29 Tunnan, as the all-blue Spitfire was out-phased by Soviet Jet designs. Yet these were never able to reach the altitude the S.31 operated at in time.
This article is partially based on information found at Wikipedia, 10th february 2015.
_(8313984453).jpg?uselang=nl "A Spitfire Pr.XIX, displayed as a Swedish Spitfire S.31 at the Flyvapenmuseum in Malmen, Sweden. Photograph shared by Alan Wilson on Flickr with an Attribution-ShareAlike 2.0 Generic CC license, as provided on Wikipedia.")
The kit
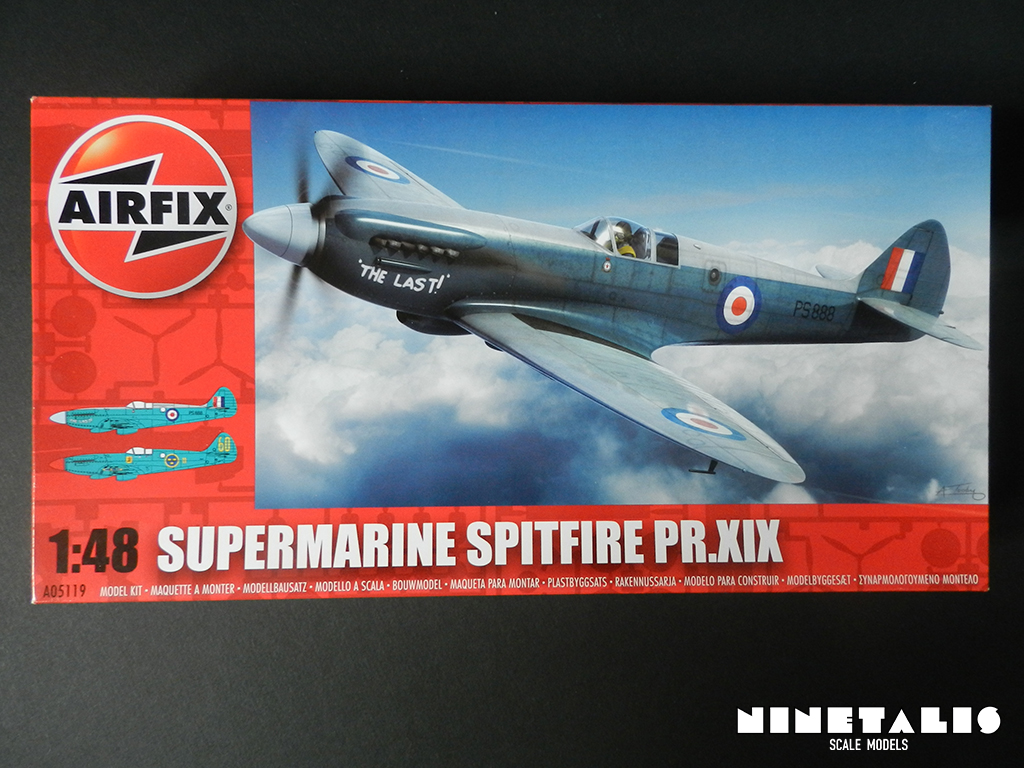
- Subject: Supermarine Spitfire PR.XIX / S.31
- Manufacturer: Airfix
- Scale: 1/48
- Parts count: 98
- Serial: A05119
- Price: 20 EUR – 25 USD
- Personal rating: ✭✭✭✭✭ ✭✭✭✭✭


The box
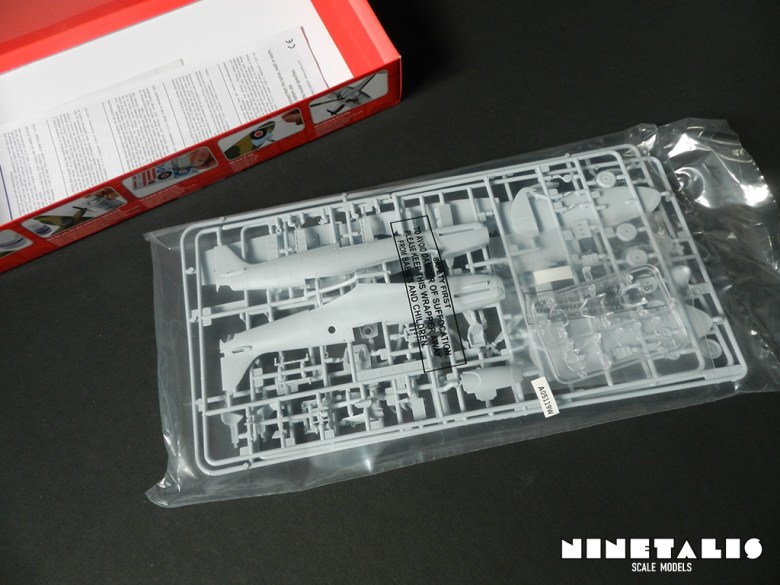
The design of the box is the usual fully printed box with its red Airfix accents. The type of cardboard is pretty flimsy, but folded in such a way to give it a better structural strength. The top and bottom part are held together with two clear, round stickers.
On the box we can not only find the box art, but also simple hints, like how to place your decals on a model, complete with pictures and short captions. On the bottom is some advertising about the Airfix club and the Airfix website. Inside the box we can find the sprues wrapped inside a plastic bag. The clear sprue is also inside this bag and is individually wrapped in another small plastic bag as well.
Sprue A
The A sprue contains the two fuselage halves, inside flaps, elevators, rudder and wheels. Here we can already see the amount of detail and work that Airfix has put into this kit. There are small rivets all over the hood and other part of the fuselage. Reference material shows the same rivets and are the same size in scale as used here. There is a minuscule bit of flash on the hood, but nothing really bad and it is easily removable. On the inside of the fuselage we can find some tiny details. The wheels are molded in two parts (not halves!) being the rubber wheel and the outside rim. This is good as when you are painting the wheels you can achieve a sharp edge by painting them separately and glueing them together after the paint job so you have a sharp edge.


Sprue B
Sprue B takes account for the bottom section of the wings, the 5-bladed propellor, the horizontal stabilizers, the radiator covers, a pilot figure and some of the cockpit walls. Here again we can see the amount of detail Airfix incorporated into the kit. There are small rivets on the appropriate panels and sink holes are intelligently placed on places that aren’t visible after completion of the aircraft. The only remark I can give here is that on some airframe spars inside the cockpit there should be certain holes. On the other hand these holes are indicated as recessed circles, and can be drilled by hand with a little bit of patience and caution.


Sprue C
The final sprue holds the upper sections of the wings, outside flaps, ailerons, the air intake, landing gear, spinner, pilot seat and the leftover parts of the cockpit. The parts are again well detailed, but the seat has holes in them (as the real aircraft had them too) but these are in scale a lot larger than the holes on the actual seat. Also when constructing the aircraft, the flaps don’t fit well and need to be carefully re-adjusted to a certain degree to make them fit better and settled in a more realistic position.


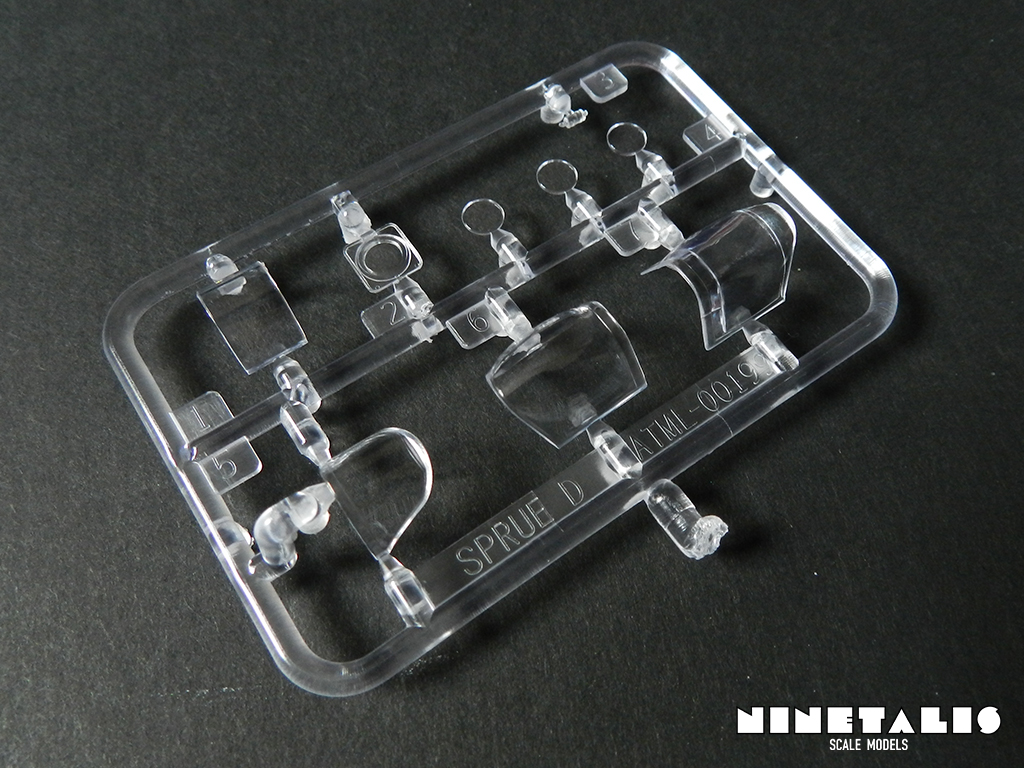
Clear sprue D
The clear sprue is packaged inside a small clear plastic bag. It features some optional parts like 2 different canopies and a part that can be used as a little door that is in an open position. On the actual aircraft this door provided the ground crew to reach the optical equipment that provided the photographs made during a sortie. But to apply this part to the model, you need to make a hole by drilling and cutting in one of the fuselage halves. The other clear parts did fit pretty much flawlessly on the constructed fuselage
I must also add that this is the only place where Airfix has flawed. A bit in design but mainly with the material. I say this because this has to be the most fragile clear parts sprue I’ve ever had to deal with. For one the material itself is really fragile, upon attempting to remove part D1 with the usual utmost care, the part just instantly snapped in two. The addition that the part is really thin and that the place where part is connected with the sprue is really think just makes matters worse. There are also little ‘feet’ on the bottom of the sprue, which prevent the parts itself to have contact with the ground at all time (including when you try to remove them) and makes you use more force, which will most likely result in catastrophic results. In order to prevent damage to the parts I strongly recommend to remove these ‘feet’ before attempting to remove the canopy parts, as I did with the replacement sprue that was send to me by Airfix.

Printed material
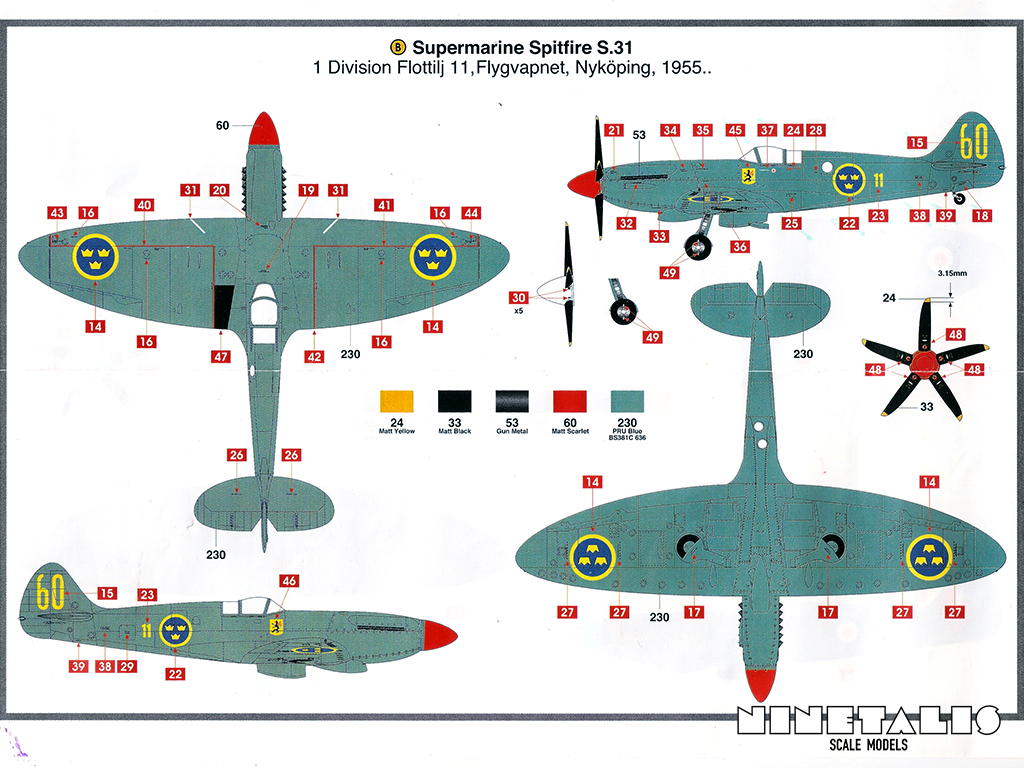
Also included in the box is the construction leaflet, a color printed flyer with the provided markings, the decal sheet and a postcard sized flyer about the Airfix club.
The decals are printed by Cartograf (although that is what the boxing says, because this information is not repeated on the decal sheet itself as we usually see with other Cartograf printed decals sheets). Wether this is the case or not, the decals do seem to be from great quality, yet I do want to add that it is not the best I’ve seen. The clear overprint is very small, but inside the numbers ‘eyes’ (the space inside the 6, 0, 8 and the letter P) it seems that the material is very matt and when applying them to the model, this is somewhat visible. On the other hand, this does downgrade the silvering for a good part, yet not completely.
Another detail is that the blue color of the Swedish roundel looks kinda… ‘off’. To my knowledge, the Swedish roundels usually sport a darker type of blue. Even more important, on the larger part of pictures that I found, it was clearly visible that the insignia’s were much darker than the color of the aircraft, this conflicts with the decals provided and the color that are recommended for usage. It is not that much of a drama when accuracy is not your main concern, but those who do take accuracy very seriously should probably address this.


The instructions
Thehe cover of t instructions leaflet features small texts in various languages about the
Pr. XIX. The instructions are build up from illustrations that are computer generated. These are very clear and split up into 36 steps and I had no problems understanding them.

The included markings from the kit can not be found within the instruction leaflet, but are on a sheet inside the boxing. It is printed in full color on a glossy sheet of paper.
Airfix gives us the choice between two distinctive markings, one being an RAF aircraft of No.81 Squadron based at Singapore in 1954, while the other is a Flygvapnet (Swedish Air Force) machine of 1st Division Flottilj based at Nyköping in 1955, which was the year Swedes ultimately replaced it.

Conclusion
This kit is yet more proof that Airfix has upped their game these last years and is no longer that company that only sells their outdated remolds which many people love, but an equal amount of people despise. With this kit, it just adds another piece of evidence that Airfix can still play with the big boys. It is also nice to see larger companies like Airfix tackle less-known types and variants and it is welcoming to finally see a recon Spitfire in quarter scale.
Aside from all that, I should admit that I was pleasantly surprised with this kit, since I had no problem constructing the kit at all (aside from damaging the fragile clear parts) and was very impressed with the perfect fit of nearly all the parts. It is also a very easy kit that builds into something really nice, really fast. Even the price is not bad at all, which is most often around 20 euros or 20 dollars.
Considering all the factors I mentioned above, this is kit is definitely recommended to everyone, from beginners who have never done any scale modeling to mediocre people who like well fitting and quick easy builds, to professionals who like well detailed boxings.
The build and result
If you wish to see what the kit can be build into, you can check out the diorama I constructed in the gallery by clicking this link or the image below. To see pictures of the build itself, or hints on how to tackle this kit yourself, check out the WIP-album on my Facebook page.

